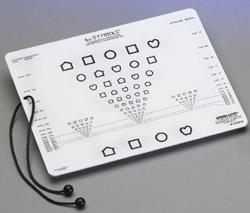
LEA SYMBOLS®
Near Vision Card
#250800
Near vision is functionally more important than distance vision in the life of a young child and persons with visual impairment. The child is also more accustomed to using vision at near than at greater distances. Therefore introduction of the test situation at near familiarizes the child with the test situation. You learn also about the child's functional vision. For example, in the rare case of myopia you will find that the child has useful vision at near and parents will not be alarmed when the child does not see well during the distance visual acuity test.
Instructions
When examining normally sighted children, hold the card at 40cm (16 in), the length of the cord. Let visually impaired children use their preferred distance and head posture during the first testing, later measure at 40cm (16 in) if the child also uses that distance in visual tasks.

The more crowded test with 50% and 25% spacing between the optotypes is a sensitive test to detect the increased crowding phenomenon. 50% spacing means that the space between the optotypes is one half of the width of the optotypes. The short video of the test situation with the line test side above shows measurement of binocular near vision acuity during the first assessment of the child. The line above the line to be read is covered with a white card.
-
Establish a method of communication such as naming (signing) or pointing (matching). Decide with the child which names will be used to identify the symbols. When needed, train with the LEA 3-D Puzzle (#251600), Response Key Card (#251700), or Flash Cards (#251800).
-
Start with binocular testing, using the centre grouping of symbols.
-
Point to each of the four symbols (circle, house, apple, square) on the top line, observe the baseline responses for comprehension, speed and accuracy.
-
Cover the top line with a white card (the reverse side of a flash card may be used).
-
Ask the child to identify only the first symbol on the line below the covering card.
-
Repeat this procedure for each or every second line (moving quickly down the chart to avoid tiring the child) until the child hesitates or misidentifies a symbol.
-
Move back up one line and ask the child to identify all the symbols on that line.
-
If the child identifies all symbols correctly go down to the next line and ask the child to identify all the symbols on that line.
-
If the child skips a symbol, ask the child to try again while briefly pointing to that symbol.
-
The visual acuity is recorded as the last line on which at least 3 of the 5 symbols are read correctly. Always test until the threshold line.
-
If the chart is held at 40cm (16 in), the visual acuity value is found in the margin adjacent to that line.
-
After binocular testing, proceed with testing each eye separately. When the right eye is covered ask the child to identify the symbols grouped on the lower left of the card (lower right when the left eye is covered). Cover the non-dominant eye first. Use two pairs of plano glasses for occlusion of the child's eyes or the special screening frame with only one opening in the frame (TiaraFashion) that can be used for covering both eyes, one at a time. This is the least disturbing type of occluder for children.
-
For monocular testing, follow the same procedure as for binocular testing.
-
If the child is able to perceive details close to each other, use the reverse side of the near vision card where the same symbols are spaced more closely, as if in words or sentences. The testing procedure is the same as for binocular testing on the front of the card. The close spacing of the symbols on this test makes it a sensitive test for the detection of a specific difficulty in keeping details apart. In children with brain damage there may be great differences between visual acuity values measured with the line test and the more crowded tests. - A 4-year-old patient of mine once looked very surprised when I showed her the more crowded side of the test and said "It is impossible to look at those pictures. They hug each other." That sentence depicts the difficulty in keeping the details apart from each other when the posterior pathways are damaged. Single symbol acuity may be normal or near normal.
-
Visual acuity measured with crowded symbols approximates the smallest text size that the child will be able to read. It is NOT equivalent to the print size used in learning because nobody likes to read close to the level of threshold. We usually read texts that are 3-10 times larger than the threshold size.
-
The test is supplied with training cards and a response key. For convenience, the test has a response key line at the bottom.
Monocular near vision testing
Monocular near vision values are important in the follow-up of amblyopia treatment. Visual acuity values often improve first at near and later at distance. Before the age of three years it is usually easier to measure monocular near vision values than distance visual acuity values.
As a part of vision screening, monocular testing is of special interest at the age of 6-7 years and later. If visual acuity at distance has become less than it was at age 4, or if there is difference between the two eyes, near vision acuity measurement may reveal that the cause of this change is beginning myopia.
If the near vision values are symmetric and as before or better, the change in distance vision cannot mean anything else but mild myopia. The child does not need to be referred. Reducing the number of unnecessary referrals decreases screening expenses and improves the quality of screening.
Testing Near Vision at Shorter Distances
A child with a visual impairment is allowed to choose any distance for the measurement and is given a correction for that distance, if needed. If the card is used at a distance other than the usual 40cm (16 in), measure and record the viewing distance and the symbol size read (the M value*) or the visual acuity value printed adjacent to the threshold line.
To determine the visual acuity use one of the following formulas:
Note that it is incorrect to report ' V.A. 20/25 at 8 inches' if the child could read the 20/25-line (.50M line) at 8 inches. Visual acuity is in that case: 8"/16" x 20/25 = 1/2 x 20/25 = 20/50. (When using the British notation: 6/9 line at 20cm equals: 20cm/40cm x 6/9 = 1/2 x 6/9 = 6/18. When using the decimal notation 0.8 line at 20cm equals: 20cm/40cm x 0.8 = 1/2 x 0.8 = 0.4.)
When the distance is one half (or one third) of the standard distance, the visual acuity value is also one half (one third) of the value printed next to that line.
If you do not want to do the calculations, report the result as M-unit value, i.e. in the previous case .50M at 8" (20cm). Visual acuity is easy to calculate based on these values:
VA = 0.2m/.50M = 2/5=4/10=0.4 or 2/5=20/50 or 2/5=6/15.
The calculation is based on metric measurements. The corresponding visual acuity values in the American and in the British notations you can also find on the visual acuity card. If the exactly corresponding value is not printed on the card, calculate it as follows: For example 0.07= 7/100= [7x3/100x3]=21/300 or 20/300; or for the British notation: 0.07=7/100=6/86 (6x100/7=86)
You multiply both the numerator and the denominator with the number that makes the numerator equal or closely equal to 20 or 6.
Always remember to record which test you used and at which distance. This makes the follow-up more reliable, even if the child moves to another school and will therefore be tested by another school nurse and another doctor.
Assessment of accommodation function of the amblyopic eye
At a time when the visual acuity of the amblyopic eye has become equal with that of the dominant eye, the speed of accommodation may not yet be as good as it is in the dominant eye. You can test the speed of accommodation/ focusing using the near vision test and distance vision test so that you cover on both tests the same lines and test the speed of recognizing the optotypes on the line below the cover on the near and distance vision test in turn. The test line is the line above the threshold line. For example if the threshold line, the smallest line read with both eyes was 20/25(6/7.5, 0,8), cover the lines above the 20/32 (6/9.5, 0,63) line (if you test alone, tape a white paper on the distance chart and cover the near card with the white side of a training card).
Test the dominant eye first. Ask the child to tell the first optotype/picture on the 20/32 line in the near test, then immediately “What is the first picture on the line below the white paper on the big chart?” Next “What is the second picture here on the near card?” and again “What is the second picture on the big chart?” You notice the speed when the child switches from the one to the other test.
Next test the amblyopic eye the same way. As long as the speed of focusing in the amblyopic eye is longer than that of the dominant eye, the amblyopic eye needs some training, especially in looking at different distances like when copying small simple pictures, numbers, or letters that are at a distance of 2 metres.
*M-unit, metric unit is the distance in meters at which the reference optotype C is seen at a visual angle of 5'.
[ Instructions I Paediatric Vision Tests I Vision Tests ]
This document was last modified on