LEA Campimeter
If you do not have a test to assess central visual field, you can make it yourself. If you use the same place of a room with the same illumination each time, the visual field measurements are comparable over time.
For the measurement on white paper you can arrange a low luminance level or a high luminance level or both. Record carefully the lamp, its distance from the test and position; i.e. in which direction the lamp is directed. If you make the measurement on a black, non-glossy paper you will have a third kind of visual field. These three visual fields give you a lot of information on the function of the central visual field at different luminance levels. Combined with the visual acuity and contrast sensitivity values that you can measure at 80 cd/m2 and 3 cd/m2 with the ESV1500 lightbox, you have a good battery of tests for detection of high contrast black-and-white stimuli in the central visual field. Add grating acuity, a quantitative colour vision test, and motion perception tests and you have more information for functional assessment than most university hospitals use.
You can measure the size of the visual field with the LEA Flicker Wand and VIV test, which can be used e.g. to measure the size of a ring scotoma in the mid-peripheral visual field of a child who has retinitis pigmentosa (RP) like changes in the retina. In such a case it is also important to learn more about the central visual field, especially in countries where RP causes patchy loss of central visual field quite early.

Figure 1. The test idea for measurement in photopic luminance conditions. The location of the edge of the blind spot has been marked with a thin line. In the pdf, the copy that is used in the measurements does not have the lines in the central part of the test because the lines would disturb the detection of the test dot.
Test material:
- Make copies of the pdf (Figure 1) on a sheet of white and a sheet of black paper.
- Tape the white test in the middle of a large white paper (flip chart paper or an A3 paper) on the white wall where you have decided to use it; the black paper on a large black paper.
- Glue the stimulus sticks on thin cardboard and cut them carefully. Watch that you do not cut away a part of the dot. The dots are 1 mm and 3 mm for nearly normal visual field and 6 mm and 9 mm for impaired vision.
Markings on the floor:
- Mark on the floor distances of 57 cm, 114 cm and 228 cm. These are the most commonly used distances. At 57 cm distance from the patients’ eyes, one centimetre on the test equals one degree of visual angle. Thus at 114 cm distance, 2 centimetres equal one degree and at 228 cm, 4 centimetres equal one degree. If the visual field is really small, you have more space for the movement of your stimulus at 228 cm distance.
Patient’s ocular motor functions, nystagmus:
- Check that the patient does not have nystagmus, which would disturb measurements. If the patient has nystagmus, observe the dampening during convergence, which would make measurements possible at close distances. (If you have prisms, consider use of base-in prisms.) In functional assessments we are interested in measurements with both eyes open. Monocular measurements are likely to be disturbed by nystagmus even if you do not use a patch but instead of it a high plus lens to blur that eye’s image. In these cases you can measure only the “binocular” field, which often means that both eyes are used but there may not be true binocularity in the central visual field.
Fixation:
- If the person’s visual acuity is less than normal, check whether the fixation is central for a weak penlight’s light and on a small X (drawn on a tongue depressor) comparable with the X that you use in the middle of the test for fixation. If the fixation on the X has a different optical axis (eccentric fixation) compared with the fixation on the light, check whether the person can keep looking at the illusory centre where the meridian lines would cross if drawn to the middle. You may need to make the lines on the test thicker to help the patient to fixate steadily.
Test situation:
- Scanning of the visual field monocularly, Figure 2:
- Tell the patient that you will be measuring the central visual field and will try to find whether there are any other blind spots similar to the normal blind spot, which cannot be subjectively seen even if it can be measured. Check that the patient can see the stimulus dots in the central visual field.
- Make an X of suitable size for fixation in the middle of the test. Check that the patient can see it without difficulty. Cover the eye that subjectively has the worst image quality if the person does not have nystagmus, nor fixation nystagmus when the other eye is covered. Advise the patient to keep fixating on the fixation mark and to respond only to the appearing and disappearing of the test dot (not to the movement of the white stick).
- The patient should sit comfortably on a chair so that his eyes are at 57 cm distance from the test.
- Start the measurement on the meridian at the level of the X (meridian 0 or 180) from the right edge of the paper for the right eye and from the left edge of the paper for the left eye. The normal location of the blind spot is faintly visible on the test. If the person responds to the 3 mm stimulus dot at the edge of the test where the centre of the blind spot should be, ask the person to look at the centre and try again. If the person fixates well at the centre of the test and still responds within the usual location of the blind spot, check the structure of the retina to find an explanation for this finding. The blind spot is your orientation point in the measurement.
- In a usual case you bring the largest stimulus dot from the edge of the paper along the 0 or the 180 meridian toward the centre (X) and ask the child/person to tell you when the dot appears; mark that point (1). Continue moving the dot along that meridian toward the centre. If the dot disappears, mark that point (2) and when it reappears (3) (Figure 2).
- Continue testing along the other meridians and map points if the stimulus disappears and when it reappears.
- Record the edge of the blind spot with 2 more points (arrow to point 4and 5).
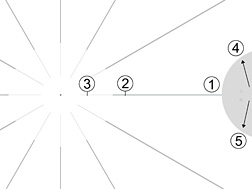
Figure 2. Recording of location of a small scotoma on the 0 meridian close to the point of fixation and the edge of the blind spot.
B. Measurement of the size of scotomas, Figure 3:
- Next, test the poorly perceived points with the 1 mm dot. Bring it with the white side of the stick toward the patient to the middle of the location where the largest stimulus was not seen. Turn the dot visible at the middle of the presumed scotoma. Move it along the meridian toward the centre until it is seen; mark this point (4). Hide the dot by turning the stick. Turn the stimulus visible at the presumed middle of the scotoma; then move the stimulus dot along the meridian away from the centre until it is seen. Mark this point (5).
- Bring the hidden stimulus to the centre of the scotoma, turn it visible and move it perpendicular to the meridian until it is seen, mark that point (6). Bring the hidden stimulus to the middle of the scotoma, turn it visible and move the stimulus perpendicular the meridian in the opposite direction. Mark this point (7). You may want to measure additional points to record the form of the scotoma carefully (8).
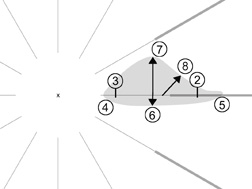
Figure 3. Recording the scotoma with its less damaged area around the absolute scotoma. The measurement was made with the test where the lines are not visible in the centre. The result is here drawn on the paper with the meridian lines to show the location of the scotoma.
Now you have measured the “relative scotoma” around the “absolute scotoma”. The absolute scotoma may not be so total that a bright dot of light would not be detected inside it but it is absolute to black details like parts of letters. However, because the eyes move and the brain interpolates over empty areas of the visual field, the child does not see the area with no information in it. It may cause distortion of lines or distortion in the text with some letters higher than other or disappearance of parts of words, which causes reading errors.
If the scotoma is on the right side of the fixation of the visual field it affects reading in countries where the text is read from left to right. If the scotoma is on the left of the fixation it disturbs reading when the direction of reading it from right to left. Knowing the form of the scotoma you can advice the patient to tilt the text so that the scotoma moves below the line to be read.
A case report:
Usually we do not randomly screen the central visual field like an automated perimeter. Instead, we have an observation that we want to investigate. A typical situation is in the following case:
The student had earlier had good binocular central vision with a preferred right eye, no strabismus and some peripheral retinal changes typical to retinitis pigmentosa, which in that Arab country often causes loss of central vision.
During a control visit the student had slightly eccentric fixation of both eyes to the right and down during binocular viewing. The right eye had 2 lines lower visual acuity value than the left eye. In the binocular situation visual acuity was that of the right eye. The child preferred using the eye with the lower visual acuity. There was a fine nystagmus in the regular room light.
When we arranged the luminance level, nystagmus disappeared at 5 to 6 cd/m2, which is at the edge of photopic and mesopic luminance level (the colours were barely perceptible still). This revealed that there was a relative loss of cone cells so that their activity did not prevent the rod cell activity from entering retinal function. At the usual room light level, the rod cells were overstimulated and disturbed the image. At the lower luminance level they functioned normally and, thus, could function at the same time as the cone cells (as in twilight vision). This important observation is generally not known. Children with retinitis pigmentosa-like changes are thought to see best in daylight.
The first finding occurred at the beginning of the test when the student was asked to look with the right eye at the point where the lines would cross if they had been drawn through the middle. The student said “but then the cross disappears”. This told us that the scotoma extended to the very middle of the right visual field, so the 3 mm dot was placed in the middle and disappeared there. However, if it was moved a little to the left, its edge became visible. It could be moved a little bit more to the right before the edge became visible. The edge of the scotoma was the same with the smaller dot; i.e. sharp.
When the right eye was covered and the student was asked to look at the point where the lines would cross, the student told us that the X was clearly visible. If the student fixated on either side of the X, it disappeared. Fixation above or below X showed a little bit more extension of the tiny central field. The scotomas in the left eye were larger than in the right eye and, especially on the left side of fixation, caused a “hole” in the central reading field at the site of the eccentric fixation of the right eye (Figure 4). Therefore, the right eye had better quality of field for reading.
The results of the visual field measurements explained why the eye with the lower visual acuity was preferred. It had a better central field for reading than the left eye (Figure 4).
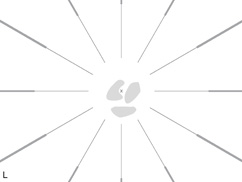
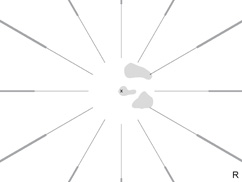
Figure 4. Small scotomas in the centre of the visual field in both eyes drawn on the recording sheet with the lines so that comparison of the two central field defects is easier. In the right eye the scotomas are in the foveal area and to the right of fixation. The scotoma of the left eye caused an empty space in the central reading field left to the fixation mark, which did not disturb the right eye’s image. When reading Arabic, changes in the central field, left to the fixation area, disturb planning of saccades and make characters to disappear.

Figure 5. The stimulus dots are seen in the correct size on the pdf . Preferably print the sticks on a thick non-glossy paper. The small dots are for assessment of nearly normal central visual fields; the large dot for peripheral visual field and for assessment of severely damaged central visual field. Printable black version.
The size of the scotomas is likely to be larger than what can be recorded with this simple technique. However, this technique can provide information that makes it easier to describe the reading situation to parents, teachers, and therapists. The loss of central visual field advances continuously and thus children with this type of retinitis pigmentosa change their reading technique often and, where possible, soon prefer to use a CCTV, which makes the text so large that small scotomas disappear.
[ Instructions I Paediatric Vision Tests I Vision Tests ]
This document was last modified on